OverviewOften in application development you encounter operations which takes more time that what you would like. Most of the time it is neccesarry to provide the user with some sort of indication of how long the process is going to take, and on the progress of the process. This is a common problem and there are numerous ways to solve it. In Qt there are also numerous solutions, with the most common being the use of multiple threads where the GUI thread says responsive while worker threads perform the work in the background. Another, simpler approach is to do the work in the main thread and manually refresh the GUI at regular intervals using Qtilities has tasking build into its core functionality and provides classes to use with your own tasks. This article discusses the approach taken to handle tasking and shows you how to use it in your applications. Table of contents: |
|
Qtilities provides a set of classes which makes tasking in Qt applications easy. Lets look at an overview of the classes provided:
The following GUI related tasking classes are available:
For more advanced tasking requirements, the following classes are provided:
The Tasking Example is a ready to use example showcasing the use of the above classes.
In Qtilities all tasks must implement Qtilities::Core::Interfaces::ITask which serves as a standard status and control interface on a task. You can either create your own implementation of the interface or use the ready to use Qtilities::Core::Task implementation.
For the rest of this article we will focus on the ready to use implementation: Qtilities::Core::Task
There are basically two directions that can be used to communicate with a task:
This is illustrated in the diagram below:
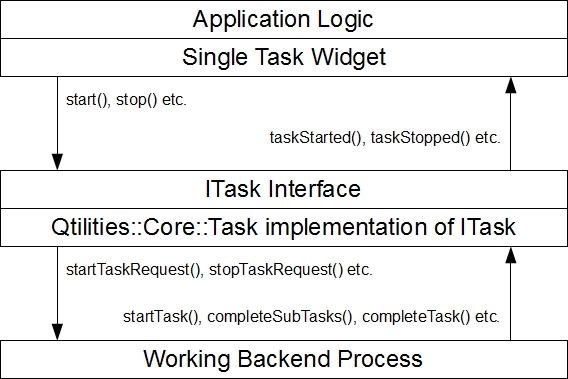
From the application side Qtilities::Core::Interfaces::ITask provides functionality to control the task through the start(), stop(), pause(), resume() slots. Notice that you cannot complete the task from the application's side, since that is the responsibility of the working backend process. The application side can listen to signals indicating that the status of the task changed. These are taskStarted(), taskAboutToStart() etc.
The working backend process is responsible to control the task and keep it in sync with the work that the process is doing. The backend process sets up the task to match its own capabilities. For example, if the user can stop the task the backend process calls setCanStop(true) on the task before it is started. When the user stops the task the backend process needs to respond to this request by connecting an appropriate slot to the stopTaskRequest() signal. This will be demonstrated in the examples that follow.
Lastly, the backend process keeps the task in sync with its progress through functions like completeSubTasks(), completeTask() etc. The Qtilities::Core::QtilitiesProcess class is a good example of how to implement a more complex backend process. However, in most cases hooking up a backend process to a task is very simple. The next section demonstrates this by using a QTimer as a backend process.
Before looking at the timer, lets just create a simple task to show how to create, start and complete a task:
In the above example you simply create a task and change its state by starting it and then completing it. The task provides a set of control and information functions which you would expect on a task. The example won't do anything usefull since the task does not represent anything at this stage.
This brings us to the most important thing to remember when working with Qtilities::Core::Task. It is used to represent a task, it does not do any work itself. Thus, you need to first have some function/code which does some work and then let it communicate with your task while its working. Also, you need to set up your task to provide the correct set of capabilities that match the work you are doing.
Now lets look at the using a QTimer as a backend working process. Thus we will create a task as well as a QTimer and link them up.
The above example shows a very basic usage example of some of the tasking classes provided. In many cases it is possible to calculate the number of steps which will be needed in order to complete a task. In such cases you can provide this information to the task representation class. For example:
Note that we log a message with each completed subtask. Without going into too much detail on task logging here, it is worth mentioning that each task can have a log associated with it (the case by default), however this can be disabled through the constructor of the Task class.
Qtilities::CoreGui::SingleTaskWidget is the most basic tasking widget and it is used to represent a single task and can easily be constructed as follows:
The figure below shows a single task widget for an example task. Note that clicking on the green icon on the left of the progress bar allows you to view the log for the specific task. Also, the task widget will only show controls for the task according to the way the task was set up. In the QTimer example above we call setCanStop(true), thus the single task widget will provide the ability to stop the task. If it was set to false, the red stop button would have been disabled.

The single task widget can be added anywhere in your application where you would like to display information about a task. However in some cases you would like to show all tasks in your application. Qtilities::CoreGui::TaskSummaryWidget provides this functionality and is customizable in order for your needs. It can for example only show active tasks, or all tasks (active and inactive).
To create a task summary widget is straight forward. For example:
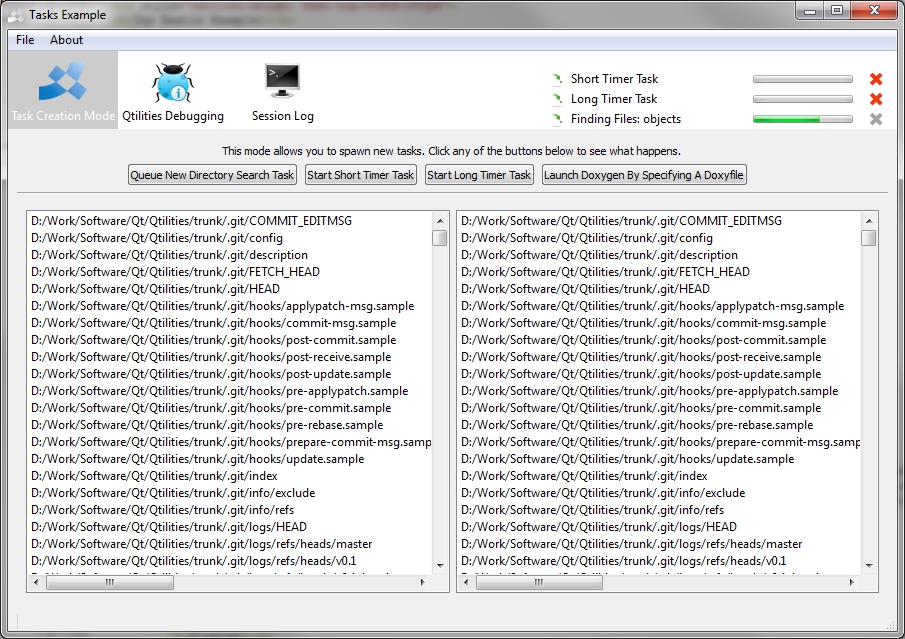
It is important to note that only tasks registered in the global object pool and set as global tasks (see Qtilities::Core::Interfaces::ITask::TaskGlobal) are shown in the task summary widget. The figure below shows a task summary widget which shows three active tasks. Note that the QTimer task can be stopped.

When using Qtilities::CoreGui::QtilitiesMainWindow you can set it up to show a task summary information automatically for you. This makes it very easy to provide an overview of tasks in your application. The Tasking Example demonstrates this:
The tasking classes provided were designed to be as generic as possible, allowing them to be used in the widest possible set of scenarios. This section shows a few additional possible usages.
The following example shows how to add a task to an existing slow function. This task will show up in all Qtilities::CoreGui::TaskSummaryWidget widgets and dissapear as soon as the task is completed (thus it goes out of scope). In this example all messages logged to the task will be logged to its own logger engine.
It is also possible to log messages from the task as system wide messages in your application. In the next example this approach is followed (note that the task itself does not have a log anymore in this example).
Qtilities::Core::QtilitiesProcess allows you to use QProcess as normal with a tasking wrapper around it. This is shown in the following example taken from the Tasking Example.
| Qtilities : Reference Documentation | Back to top |
Copyright © 2009-2013, Jaco Naudé
|

