OverviewQtilities provides a set of classes which make tree building a trivial task. This article will explore these classes and show different ways to build trees. The tree classes also provides many additional features which comes in handy and saves time. The main class doing the work behind the scenes is Qtilities::Core::Observer. However this article will not look at the details of how things work, it will just show how to use the classes and build trees without worrying how it works in the background. The Observers article is a good place to start if you are interested in the details. Table of contents: |
|
Before starting to build actual trees, lets look at the set of tree building classes provided which are shown below, where classes doing work behind the scenes are colored in grey.
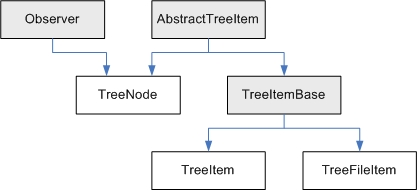
The different classes has different responsibilities:
It is easy extend the set of tree items by creating objects which inherit from Qtilities::CoreGui::TreeItemBase.
Trees are constructed on the principle that the Qtilities::CoreGui::TreeNode class can contain child items (leaf nodes) or other tree nodes. This allows us to build any tree structure that we want and in this section we will discuss and show how to build trees with different requirements.
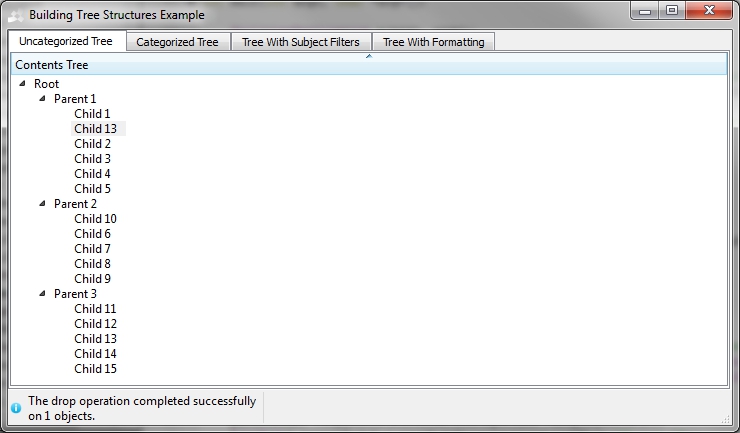
The BuildingTreeStructures example in the QtilitiesExamples project shows a few trees which you can play around with or change to code to change the trees. The screenshot below shows this example in action:
Lets look at a very simple tree with a depth of 2 which looks like the one shown below.
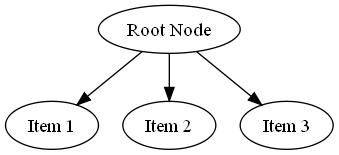
To build this tree using Qtilities is done like this:
We can increase the depth to 3 and also introduce an advanced concept of Qtilities trees where any item in the tree can have multiple parents. The "Shared Item" in the tree below has both "Node A" and "Node B" as its parents.
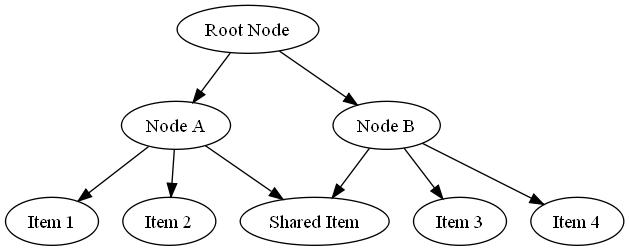
To build this tree using Qtilities is done like this:
As you can see, building trees with Qtilities is easy. It is important to understand we are using two basic classes, Qtilities::CoreGui::TreeNode and Qtilities::CoreGui::TreeItem here. However it is possible to build trees with your own items where tree nodes are based on Qtilities::Core::Observer and your leaf items can be any QObject based class. The More advanced trees: Controlling activity and names of items under a node section of this page introduces more advanced concepts but for now we will focus on building trees on a higher level and displaying them.
For the curious reader, the tree diagrams shown above were created using Qtilities::Core::ObserverDotWriter.
An important feature of a tree node is that is can group child items into categories where a category icon will automatically be assigned to category nodes. This functionality is controlled by the Qtilities::CoreGui::TreeNode::enableCategorizedDisplay() function. The first tree is a simple tree which uses this feature to group items into different categories. The advantage of the categorized approach is that it is very simple to use and we can easily construct very deep trees since we don't have to construct the category nodes manually. The disadvantage is that we don't have access to the category nodes, thus we cannot control their formatting or define the context used for items inside the category (activity or naming control for example).
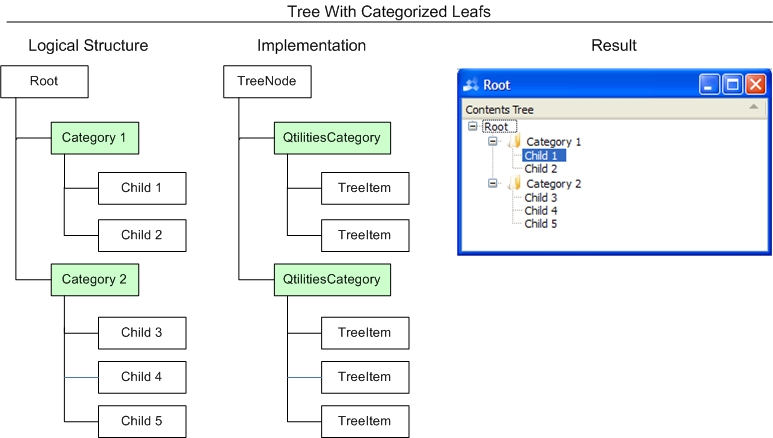
The actual implementation is show below:
Note that deep trees can be constructed by using different constructors of Qtilities::Core::QtilitiesCategory. For example:
Building trees without categories is powerful but becomes tedious when a tree gets deep and the nodes have to be created manually. Lets build the same tree again, but this time without using categories. To keep the examples to follow short, the code to create and show the observer widget is not repeated again.
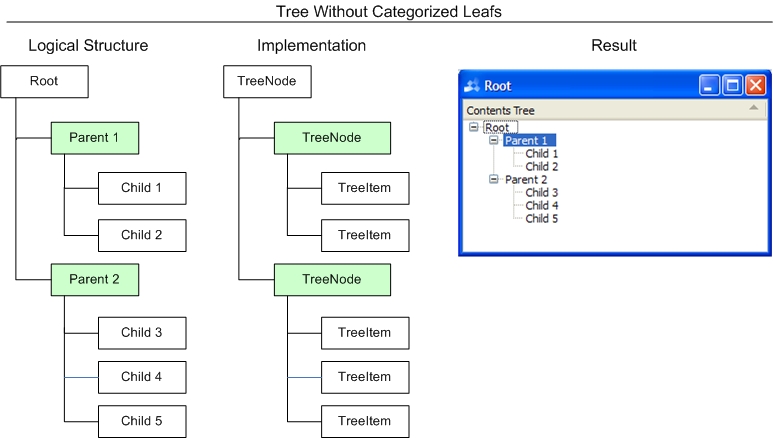
The actual implementation is show below:
It is clear from the above example that deep trees will take much more lines of code than the categorized approach. This approach does however allows for much more complex trees to be build. In the trees that follow this will become apparent.
A very powerful feature of Qtilities trees are that they can save any created tree to a XML file and reconstruct it at a later time. A tree can also be defined entirely in XML and then constructed in memory and shown to the user.
Lets demonstrate this using the example tree presented thus far. Lets assume we append this to the above example:
The format of the output tree is defined by Qtilities::ExportVersion and a detailed overview of the output format can be found on the Serializing Qtilities Data Types Overview page.
Tree nodes and items (excluding category nodes) all inherit Qtilities::CoreGui::AbstractTreeItem which provides functions to format these items. For more details on the allowed formatting, see the class documentation. It is possible to combine the two approaches described thus far. That is, we can create a tree with tree nodes using categories along with other tree nodes which does not use categories.
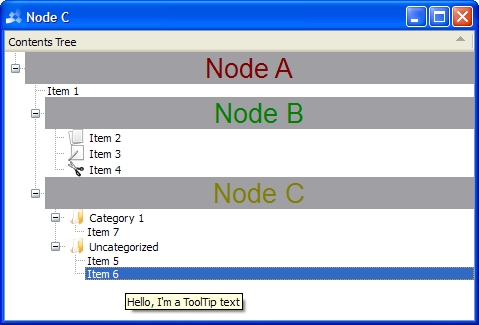
Lets create a formatted tree to demonstrate this.
The resulting tree is shown below. Note that "Node C" contains categorized items while the other two nodes does not use categories. There is no limitation on combining different nodes. It is for example possible to attach an uncategorized node to a specific category in a categorized node.
Controlling the activity and/or names of items under a node is a common requirement found in applications. The tree building classes makes this very easy. The image below shows the required tree and its implementation.
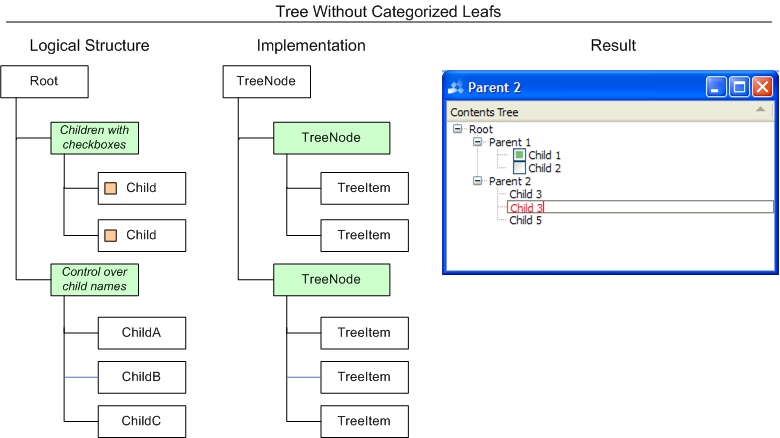
The actual implementation is show below:
For the above code we see that it is possible to easily define how activity and naming control must be handled for items under a tree node. This example is only the tip of the iceberg and only shows the solution to one required tree. The activity control provides many options to the user. We can for example tell parentNode1 that only one child can be active at one time, or that the activity must follow the user's selection when items underneath parentNode1 are selected. It is also possible to define custom policies for a tree node or policies can be combined. The goal of this article is not to explore these features in depth. If you are interested in all the features available to developers, the following are good places to start:
Articles
API Documentation
It would not be possible to meet the requirements of the above tree using the categorized approach. The important thing to remember when building trees is that each node defines a context for the items attached to it. This allows us to control for example activity, or names for items underneath a node. Using the categorized approach results in a node which contains all its children, does not matter in which category they are, in one context. This can be desired in specific cases and in those cases categorized nodes in a tree is the way to go.
Now that we've shown how to build some example trees, we look at other features and advantages of the Qtilities tree structure.
Any object can have multiple parents and can be attached anywhere in the tree multiple times. Thus we can get the reference of a tree item under a node and attach it to a different node. From a user's perspective the result looks the same but from a developers perspective this open the door to additional possibilities when building trees. We can get the parents or children of any item in the tree as follows:
A limitation of this flexibility is that recursive tree structures are not allowed and this is automatically checked each time a new child is attached to a node. The Qtilities::CoreGui::TreeNode class provides many other useful functions to use. See the class documentation for more information.
A powerful feature is the ability to monitor modifications to a tree. This is done through the Qtilities::Core::Interfaces::IModificationNotifier interface. This interface allows any object in the tree to broadcast any changes to its modification state. An example of where this is useful is where a tree is part of a project. In that case we want to indicate to the user that the project must be saved as soon as the tree structure or any of the objects in the tree change.
We can check if a the example tree is modified, and change the modification state of the tree as follows:
Tree nodes also provide a number of signals which can be monitored if you are interested in specific changes in a tree. See the Qtilities::Core::Observer class documentation for more information.
Trees can be compared to each other, and information about a tree can be serialized to a QDataStream using the Qtilities::Core::ObserverRelationalTable class.
We can also export detailed information about a tree to files are read them back at a later time. See Qtilities::CoreGui::TreeNode::saveToFile() for more information.
Trees automatically monitor the lifetime of objects inside the tree. Thus if we delete any item or node in a tree the tree will automatically refresh any observer widgets displaying it.
Note that rootNode will still have its objects attached to them after the detachAll() call. It is important to avoid memory leaks when detaching objects, thus you must then manually manage the lifetime. See Object lifetimes: Managing object lifetimes using observers for more information on this topic.
The tree building classes presented thus far deal with trees from a user's perspective. We defined how the must look to the user and then created it. The Qtilities tree structure provides the ability to build trees with any objects. That is, we can create a tree node and attach any QObject to it. When the tree is displayed the objectName() of the attached object is used as the name of the item. We can also build trees that will never be shown to the user, for example we create a tree and define the ownerships of the items in the tree in such a way that the lifetimes of objects in the tree is managed in a specific way (think of garbage collection).
Because trees can be so generic, they are parsed in a very specific way depending on what you are doing with the tree. This section provides details of how the parsing happens inside the Qtilities classes.
In Qtilities trees are parsed in several places and it is important to make sure parsing happens in the same way everywhere. The following list gives an overview of classes where tree parsing happens:
All of these classes support the following approaches to parsing trees.
This approach is the most common and easiest and was used in the examples presented in this article so far. The tree is made up of Observers with other observers underneath it, with other observers underneath these observers etc.
| Qtilities : Reference Documentation | Back to top |
Copyright © 2009-2013, Jaco Naudé
|

